
What Maintenance Is Needed After Installing a Filling Machine?
What Maintenance Is Needed After Installing a Filling Machine?
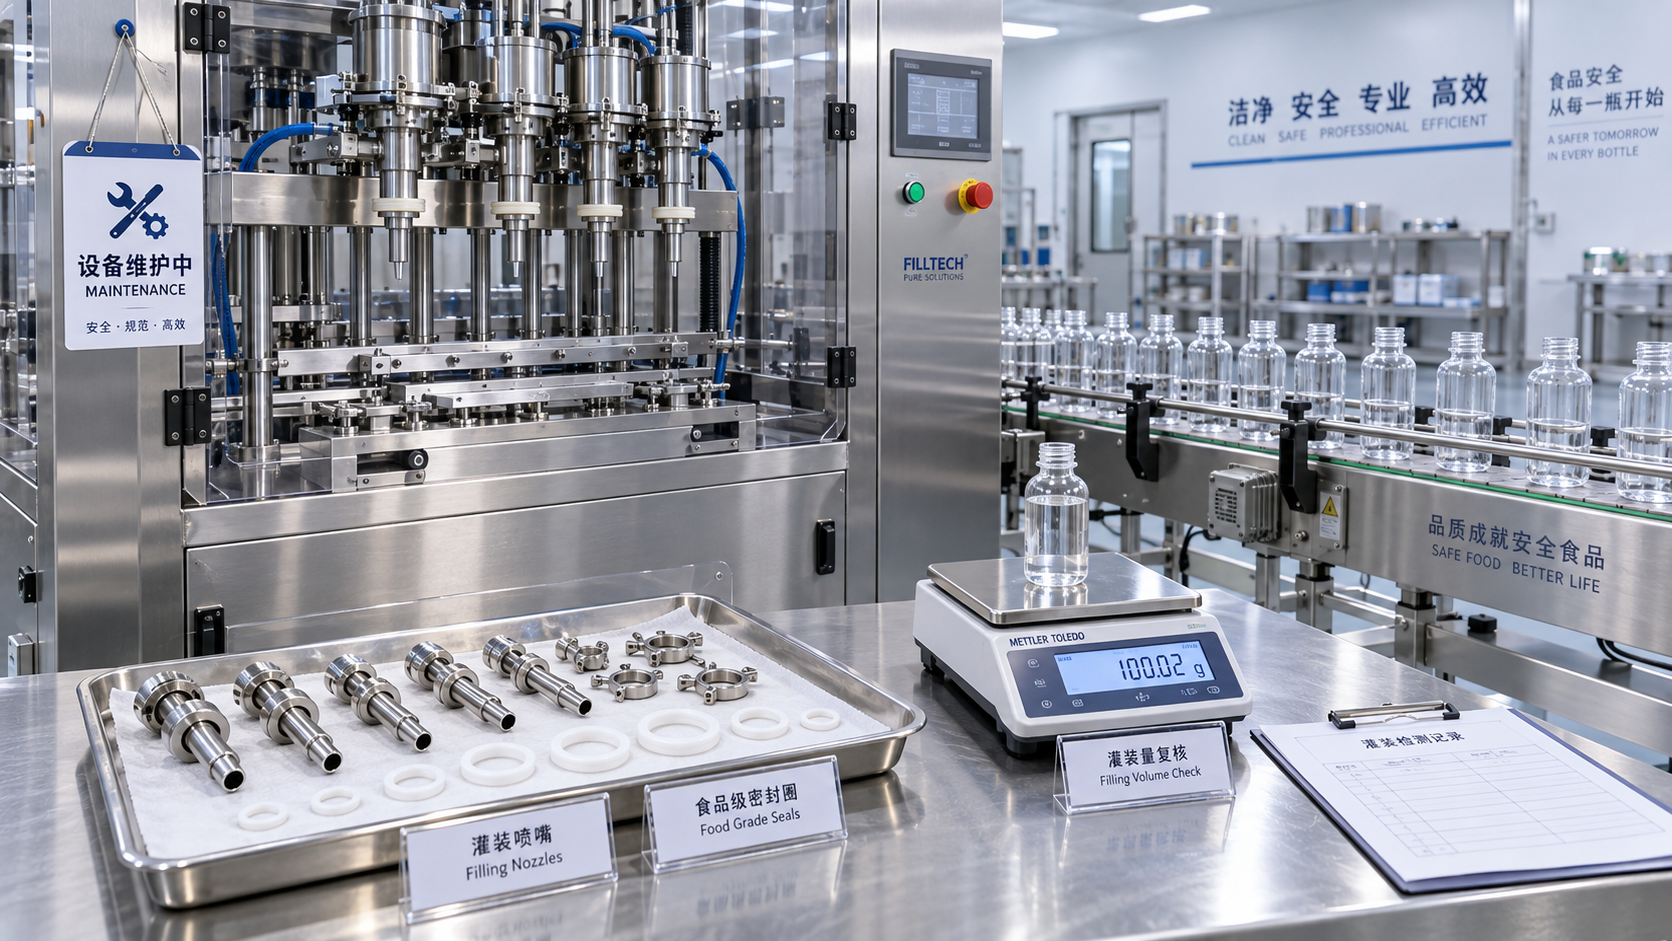
What maintenance is needed after installing a filling machine? The answer goes beyond routine cleaning. A practical maintenance plan covers filling nozzles, product-contact seals, lubrication where specified, fill-volume verification, and safety checks. It also accounts for the product being handled and the equipment connected to the filler.
The schedule for a machine filling cooking oil will not look exactly like one handling shampoo, solvent, or a pharmaceutical preparation. Product residue, viscosity, chemical compatibility, and hygiene requirements change what needs attention. The manufacturer’s instructions should set the baseline; actual operating conditions determine where additional checks are needed.
The most useful approach is to establish a reliable starting condition after installation, assign routine tasks, and investigate changes before they become recurring stoppages. A filler that still runs is not necessarily filling accurately—or safely.
Record the machine’s starting condition before routine production
Installation and commissioning should leave more than a working machine. Keep the approved operating settings, equipment manuals, electrical and pneumatic drawings, lubrication instructions, and recommended spare-parts list together. Record the product, container format, nozzle configuration, and operating conditions used during acceptance checks.
This information gives maintenance staff something meaningful to compare against. If filling becomes inconsistent later, knowing the original product temperature, supply pressure, and filling settings helps distinguish mechanical deterioration from a process change.
During early production, pay particular attention to hose connections, mounting points, leaks, unusual vibration, and container transfer alignment. Transport and installation can leave issues that only become apparent under load. Do not indiscriminately tighten every fastener: use the specified torque and adjustment procedure, especially around sanitary fittings and seals.
Before opening guards, disconnecting product lines, or accessing moving parts, isolate hazardous energy using the site’s lockout/tagout procedure. Electrical isolation alone may not remove pneumatic pressure, trapped liquid pressure, or stored mechanical energy. Maintenance involving hazardous chemicals also needs the appropriate draining, decontamination, and exposure controls.
Clean the product path—not just the visible machine surfaces
Cleaning is usually the most frequent maintenance activity, but wiping the frame does little for residue inside a valve or behind a gasket. The cleaning procedure should cover the hopper or supply tank, pumps, hoses, manifolds, valves, and filling nozzles, including areas where product can remain after draining.
The method depends on the machine design. Some systems support clean-in-place operation; others require removal and manual cleaning of product-contact parts. Do not assume that circulating cleaning liquid through a filler reaches every internal surface. Follow the equipment’s intended cleaning method and verify its effectiveness for the product.
Sticky products can leave deposits that restrict valve movement. Products containing particles may lodge in narrow passages. Food and pharmaceutical applications may require documented cleaning verification or validation under the applicable quality system. Chemical applications need particular attention to compatibility between the product, cleaning agent, seals, and metal surfaces.
Cleaning-agent concentration, contact time, temperature, and rinsing requirements should come from approved procedures—not an operator’s estimate. More aggressive cleaning is not automatically better; it can shorten seal life or damage components. Avoid spraying electrical cabinets, sensors, or connectors unless their protection rating and the manufacturer’s instructions permit that cleaning method.
After reassembly, check that seals are seated correctly, connections are secure, and cleaning residues have been removed as required. Complete the prescribed release checks before introducing saleable product.
Inspect nozzles and seals when filling behavior changes
A nozzle that drips after shutoff deserves attention even when the bottle’s final weight remains acceptable. Dripping can soil the bottle neck, interfere with closure performance, contaminate conveyor surfaces, or create housekeeping and slip hazards.
Check for deposits, damaged nozzle tips, worn valve seats, loose connections, and incorrect nozzle positioning. Stringing from a viscous product may be related to product behavior or shutoff settings rather than wear. Compare the symptom with previous runs before replacing parts or changing the filling recipe.
Seals need inspection for cracking, swelling, hardening, flattening, or leakage. A seal that looks intact can still perform poorly if it has lost elasticity. Replacement material must be suitable for both the product and the cleaning chemicals, as well as the operating temperature and pressure. Matching the dimensions alone is not enough.
Keep critical replacement seals, approved hoses, and model-specific wear parts available where lead times could interrupt production. Store them according to supplier guidance. For an OEM or tailored filling line, identify parts by drawing or part number; a description such as “small nozzle gasket” is rarely sufficient when several machine versions exist.
Check fill accuracy without hiding the underlying fault
Verify filling performance at startup, after relevant changeovers, after maintenance affecting the dosing system, and at intervals defined by the production control plan. Check each filling head separately where possible. An overall average can conceal one head consistently underfilling while another overfills.
Use a suitable, verified measuring method and the applicable acceptance limits. When checking a volume target by weighing, account for container tare and product density at the relevant temperature. A weight result cannot simply be treated as the same numerical volume for every liquid.
If results drift, resist the temptation to keep increasing the setpoint. Check the product supply level, entrained air, suction restrictions, valve condition, and operating pressure where relevant. Temperature changes can alter viscosity and affect dispensing behavior. On a piston filler, seal leakage may matter; on a flowmeter-based system, investigate the meter’s operating requirements and diagnostics.
Separate routine fill checks from instrument calibration. Passing a few bottle checks does not establish that a load cell or flowmeter is calibrated. Follow the manufacturer’s calibration requirements and the site’s measurement-control procedures. Retain before-and-after results when adjustments are made.
Lubricate selectively and monitor the utilities
Lubrication should follow the machine’s lubrication chart: the correct point, lubricant, quantity, and interval. Some bearings are sealed for life, while certain guide components must remain dry. Adding grease wherever there is movement can attract debris, damage components, or create a contamination route.
Where incidental food contact is possible, use the lubricant specified for that application. A suitable lubricant does not make uncontrolled leakage acceptable. Watch for excess grease around bearings and any migration toward containers or product-contact areas.
Pneumatic equipment needs clean air at the specified pressure. Inspect filters, drains, regulators, and accessible tubing for deterioration or leaks. Do not add an airline lubricator unless the system requires one. Unstable air pressure can cause erratic valve action that looks like a dosing problem.
Electrical inspection and repairs belong with qualified personnel. Operators can report damaged cables, loose external connectors, repeated alarms, or unusual smells, but should not open live cabinets to investigate. Safety-device testing should use the approved procedure under controlled conditions, with guards restored before normal production resumes.
Maintain the connected line as one system
A filling machine may stop because the equipment beside it is not doing its job. Misaligned conveyor guides can present bottles incorrectly. A downstream capper can create backpressure through accumulating containers. Poor rinsing or drying can introduce moisture where the process requires dry bottles.
Coordinate maintenance across bottle washing and rinsing equipment, conveyors, capping or corking machines, and downstream drying, shrinking, and carton-sealing equipment. Check transfer points after format changes, not just individual machine settings. Bottle stability at production speed often exposes problems that are not obvious during slow testing.
If the line includes product filtration, maintain filters according to their specified service criteria. Restrictions can affect product supply to the filler, while incorrect replacement elements can change filtration performance. Investigate the cause of unusually rapid loading rather than simply replacing elements more often.
For a customized line assembled from several suppliers, make responsibility explicit. Someone must own the interfaces: sensor timing, conveyor handoffs, upstream supply signals, and downstream stop requests. Otherwise, each machine may pass its individual check while the complete line remains unreliable.
Build a schedule that reflects actual use
Use the manufacturer’s maintenance intervals as the starting point. Then account for operating hours, cleaning cycles, product abrasiveness, chemical exposure, and repeated changeovers. A calendar-only schedule can miss heavy usage or lead to unnecessary work on lightly used equipment.
- At startup and during operation: check for leaks, abnormal noise, nozzle behavior, filling consistency, and container transfer problems without entering guarded areas.
- At shutdown or changeover: complete the approved cleaning procedure, inspect accessible product-contact parts, and document damage found during disassembly.
- At planned service intervals: perform specified lubrication, wear-part inspection, utility servicing, instrument checks, and safety-system testing.
- After relevant repairs: verify correct assembly and carry out the required safety, hygiene, and filling-performance checks before releasing the machine.
A small operation does not need complicated maintenance software to start. A controlled log recording the date, operating hours, symptom, work performed, parts used, and verification result can reveal recurring faults. Assign each task to a named role and distinguish operator checks from work requiring a technician.
If the same nozzle leaks again shortly after seal replacement, review compatibility, alignment, pressure, and cleaning conditions before ordering another identical seal. Maintenance should explain repeated failures, not merely reset the machine until the next stoppage. That is the point at which a routine checklist becomes a useful maintenance plan.
Thank you very much for writing to us. Please leave your message and contact information, we will reply to you within 24 hours.